There has to be a better way to incorporate the JavaScript ecosystem into Rails.
Update August 19, 2015: I’m working on revising this article to reflect much progress in this area since the original publication of this article in 2014. I highly recommend seeing the README at https://github.com/justin808/react-webpack-rails-tutorial and the pull requests (both open and closed) of what’s been incorporated since this article was first published.
Have you:
- Wondered if there’s a better way to utilize modern JavaScript client frameworks the context of an existing Ruby on Rails project?
- Gotten confused about how to integrate JavaScript libraries and examples that are packaged up into proper “modules”?
- Discovered the drawbacks of having all applications JavaScript littering the global name-space.
- Heard about ES6 (aka Harmony), the next version of JavaScript and how the cool kids in Silicon Valley (Facebook, Instagram, Square, etc.) are using ES6 syntax?
How would you like to achieve, within a Rails project:
- The ability to prototype a rich UI, seeing changes in JS and CSS/Sass code almost instantly after hitting save, without the page reloading.
- First class citizenship for utilizing the Node ecosystem, by specifying
dependencies in
package.json, runningnpm install, and then simply requiring modules in JavaScript files. - Seamless integration of Node based JavaScript assets for the Rails Asset Pipeline, thus not circumventing the asset pipeline, but co-existing with it and leveraging it.
- The ability to plug the node client side ecosystem into an existing Rails project seamlessly.
- Utilization of many JavaScript tools, such as the React JSX tranpiler and ES6 transpiler.
This article will show you how you can utilize Webpack in your Rails development process to achieve these goals!
First, I’m going to tell you a brief story of how I came to the realization that there had to be a better way to incorporate JavaScript ecosystem into Rails.
What’s Wrong with Copying and Pasting Tons of JavaScript into /vendor/assets/javascripts?
Imagine doing Ruby on Rails projects without Bundler? Oh, the horror! Well
that’s what copying tidbits of JavaScript into /vendor/assets/javascripts is
like! It’s actually a bit worse than that, as many of these JavaScript libraries
depend on either AMD (aka require.js) or CommonJs module syntax being available.
(For a great explanation of how these module systems work, see Writing Modular JavaScript With AMD, CommonJS & ES Harmony.) This would be much more of a
problem in the Rails community were it not for the fact that many popular
JavaScript libraries are packaged into gems, such as the jquery-rails gem. You
might think that works fine, until you start to encounter JavaScript modules
that lacked Gems. For example, you may want to start leveraging the many npm
packaged react components, such as react-bootstrap, or you may desire to
leverage the JavaScript toolchain, such as the JSX and ES6 transpilers
(es6-transpiler and es6-module-transpiler).
Thankfully, this experience has broken me away from the JavaScript baby bottle of
gemified JavaScript! You can now become a 1st class JavaScript citizen!

Motivation: React and ES6
My foray down the Node rabbit hole began with a desire to use the React framework, including its JSX transpiler. In a nutshell, the React library stands out as unique, innovative, and impressive. You can simply think about the client-side UI as a set of components that are recursively composed and which render based on set of data that flows in one direction, from the top level component to each of its children. For further details into the benefits of React, see my article React on Rails Tutorial. For purposes of this article, you can imagine substituting my example of using React with your favorite rich client JavaScript framework. I’d be thrilled if somebody would fork my project and create a version using EmberJs.
At first this mission of integrating React seemed easy, as there is a Ruby Gem,
the react-rails gem, that provided a relatively painless mechanism of
integrating react into a Rails project. This is definitely the simplest method.
I’ve created a tutorial, React on Rails Tutorial, with a companion github
repository, justin808/react-rails-tutorial, that walks you through using the
react-rails gem with the Rails 4.2 scaffold generator. Then I wanted to plug
in the react-bootstrap library. With no gem available, I considered manually
copy-pasting the source to my /vendor/assets/javascripts directory, but that
just seemed to smell for the following reasons:
- JavaScript has a mature system for managing dependencies (packages & modules): npm (and bower).
- Dependencies often depend on other dependencies, in both the Ruby and JavaScript worlds. Imagine managing Ruby dependencies by hand.
- JavaScript modules often depend on either CommonJs or RequireJs being available.
(Side note: in terms of Node, a module is a special case of package that
JavaScript code can require(). For more info, see the npm faq and Stack Overflow).
Here’s a good summary of other ways to handle the assets in a Rails app: Five Ways to Manage Front-End Assets in Rails. I briefly tried those techniques, plus
the browserify-rails gem. However, they seemed to conflict with the
react-rails gem, and if I didn’t use that gem, I’d need a way to convert the
jsx into js files. This led me to try the webpack module bundler.

Webpack
What’s Webpack?
webpack takes modules with dependencies and generates static assets representing those modules.
Why did I try Webpack? It was recommended to me by Pete Hunt of the React team. Here’s some solid reasons for “why Webpack”:
- Leverages npm (and optionally bower) for package management.
- Supports whatever module syntax you prefer.
- Has loaders (think pipeline), including ES6 and JSX.
- Its Webpack Dev Server rocks for quick prototypes (Hot Module Replacement) of JS and CSS/Sass code.
A good place to get started with Webpack is Pete Hunt’s webpack-howto.
I initially tried the webpack module bundler separate from Rails, as I wanted to see the “hot reloading” of react code in action. You can try this sample code: react-tutorial-hot. Hot module Replacement changes the JS code (and possibly the CSS) of the running code without any page refresh. Thus any data in the JS objects sticks around! This is way cooler than Live Reload, which refreshes the whole browser page.
Then I started using these features of Webpack:
- es6-loader, which incorporates both of the es6-transpiler and the es6-module-transpiler. For fun, try out the ES6 syntax with the ES6 Fiddle. Here’s a great references on ES6 features.
- jsx-loader, which handles jsx files using es6.
- Trivial integration of any additional packages available via npm and the ability to use whichever module syntax is most convenient.
As Webpack generates a “bundle” that is not necessarily minified, it would seem that this could be incorporated into the Rails asset pipeline, and sure enough, it can be! This is well described in this article: Setting Up Webpack with Rails along with this example code to precompile with Webpack: Webpack In The Rails Asset Pipeline.
With the basic parts in place, I wanted achieve the following:
- Be able to prototype client side JS using Webpack Dev Server (with hot module replacement), while having this same code readily available in my Rails app. This involves having JavaScript, Sass, and Image files commonly available to both Rails and the Webpack Dev Server.
- Be able to easily deploy to Heroku.
My solution to the problem is shown in this github repo:
justin808/react-webpack-rails-tutorial. This is based on my tutorial using the
react-rails gem: Rails 4.2, React, completed tutorial. I will now describe
this solution in detail.
Setup
You’ll need to install Node.js following. I’m assuming you already have Ruby and Rails installed.
- Node.js: You can find the Node.js download file here. Note, some friends of mine recommended the Node.js installer rather than using Brew. I did not try Brew.
- Many articles recommend running the following command, so that you don’t need
to run node commands as sudo, thus changing the ownership of your /usr/local
directory to yourself.
1sudo chown -R $USER /usr/local - Your
/package.jsonfile describes all other other dependencies, and runningnpm installwill install everything required.
Once I got this working, it felt like Santa Clause came to my app with the whole Node ecosystem!
Bundler and Node Package Manager
All Rails developers are familiar with gems and Bundler (bundle). The equivalent for Javascript are package.json files with Node Package Manager (npm) (see discussion in next point on why not Bower).
Both of these package manager systems take care of retreiving dependencies from
reputable online sources. Using a package.json file is far superior to
manually downloading dependencies and copying the /vendor/assets/ directory!

Why NPM and not Bower for JS Assets?
The most popular equivalants for JavaScript are Node Package Manager (npm) and Bower. For use with webpack, you’ll want to prefer npm, per the reasons in the documentation:
In many cases modules from npm are better than the same module from bower. Bower mostly contain only concatenated/bundled files which are:
- More difficult to handle for webpack
- More difficult to optimize for webpack
- Sometimes only useable without a module system
So prefer to use the CommonJs-style module and let webpack build it.
Webpack Plus Rails Solution Description
To integrate webpack with Rails, webpack is used in 2 ways:
- Webpack is used soley within the
/webpackdirectory in conjunction with the Webpack Dev Server to provide a rapid tool for prototyping the client side Javascript. The filewebpack.hot.config.jssets up the JS and CSS assets for the Webpack Dev Server. - Webpack watches for changes and generates the
rails-bundle.jsfile that bundles all the JavaScript referenced in the/webpack/assets/javascriptsdirectory. The filewebpack.rails.config.jsconverts the JSX files into JS files throught the JSX and ES6 transpilers.
The following image describes the organization of integrating Webpack with Rails.
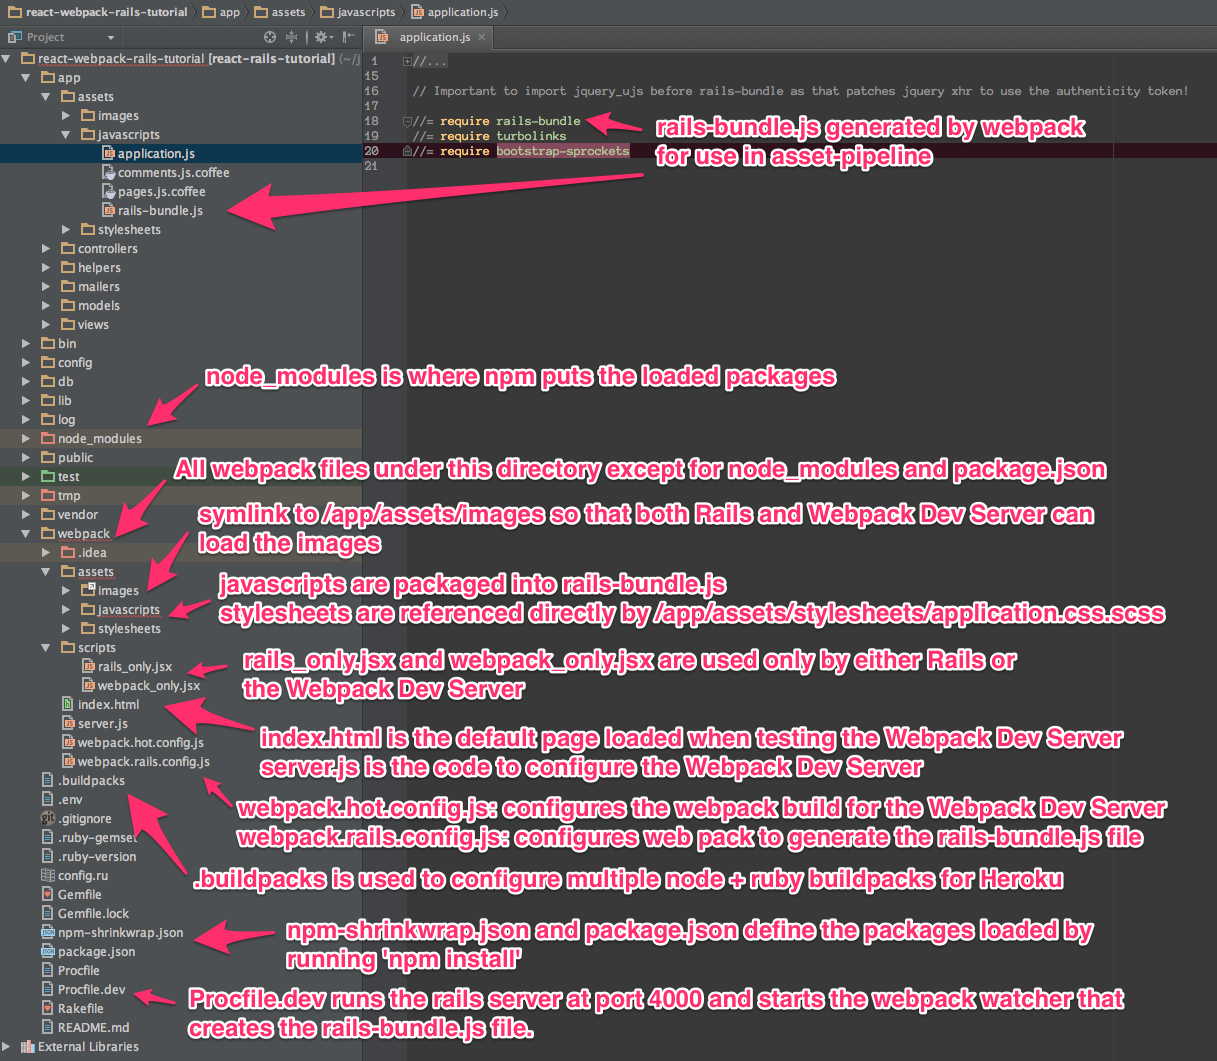
| File | Notes and Description |
|---|---|
/app/assets/javascripts/rails-bundle.js |
Output of webpack --config webpack.rails.config.js
|
/app/assets/javacripts/application.js |
Add rails-bundle so webpack output included in sprockets |
/app/assets/javascripts |
Do not include any files used by Webpack. Place those files in /webpack/assets/javascripts
|
/app/assets/stylesheets/application.css.scss |
Reference sass files in /webpack/assets/stylesheets
|
/node_modules |
Where npm puts the loaded packages |
/webpack |
All webpack files under this directory except for node_modules and package.json |
/webpack/assets/images |
Symlink to /app/assets/images. Needed so that Webpack Dev Server can see same images referenced by Rails sprockets |
/webpack/assets/javascripts |
javascripts are packaged into rails-bundle.js as well as used by the Webpack Dev Server |
/webpack/assets/stylesheets |
stylesheets are used by the asset pipeline (referenced directly by /app/assets/stylesheets/application.css.scss) as well as used by the Webpack Dev Server |
/webpack/index.html |
the default page loaded when testing the Webpack Dev Server |
/webpack/scripts |
files used by only the Rails or Webpack Dev Server environments |
/webpack/server.js |
server.js is the code to configure the Webpack Dev Server |
/webpack/webpack.hot.config.js |
configures the webpack build for the Webpack Dev Server |
/webpack/webpack.rails.config.js |
configures web pack to generate the rails-bundle.js file |
/.buildpacks |
used to configure multiple node + ruby buildpacks for Heroku |
/npm-shrinkwrap.json and /package.json
|
define the packages loaded by running ‘npm install’ |
webpack.config
To reiterate, we needed Webpack for the following reasons:
- To enable the use of JS “modules”, using either the either the AMD (aka require.js) or CommonJs module syntax.
- To convert JSX files (ES6 and JSX syntax) into JS files. Note, you probably don’t want to blindly convert all JS files into ES6, as that may conflict with some imported modules.
This setup with the webpack.config file. We need 2 versions of this file for
the two different needs, the Webpack Dev Sever and the Asset Pipeline.

Changing the webpack.config
You maybe wondering if you’ll need to edit these webpack config files. Here’s some things you’ll need to pay attention to.
-
module.exports.entry: The entry points will determine what webpack places
in the bundle. While this may seem similar to the manifest file of
/app/assets/javascripts/application.js, it’s very different in that you only need to specify the entry points. So if you specify./assets/javascripts/example(you don’t need the file suffix) is the entry point, then you do not and should not specify./assets/javascripts/CommentBoxas an entry point. Once again, dependencies are calculated for Webpack, unlike Rails.1 2 3 4 5
module.exports = { context: __dirname, entry: [ "./assets/javascripts/example" ], -
module.exports.externals: If you want to load jQuery from a CDN or from the
Rails gem, you might specify:
1 2 3
module.exports.externals: { jquery: "var jQuery" }, -
module.exports.module.loaders: This is the place where you can expose
jQuery from your Webpack rails-bundle.js so that the rest of the non-module
using parts of Rails can use jQuery.
1 2 3 4 5 6 7 8
module.exports.module: { loaders: [ // Next 2 lines expose jQuery and $ to any JavaScript files loaded after rails-bundle.js // in the Rails Asset Pipeline. Thus, load this one prior. { test: require.resolve("jquery"), loader: "expose?jQuery" }, { test: require.resolve("jquery"), loader: "expose?$" } ] }
That being said, it’s well worth familiarizing yourself with the documentation for webpack. The gitter room for webpack is also helpful.
Webpack Dev Server and Hot Module Replacement
While waiting for webpack to create the rails-bundle.js file and then reloading the Rails page is not terribly time consuming, there’s no comparison to using the Webpack Dev Server with Hot Module Replacement which loads new JavaScript and Sass code without modifying the existing client side data if possible. If you thought Live Reload was cool, you’ll love this feature. To quote the documentation:
The webpack-dev-server is a little node.js express server, which uses the webpack-dev-middleware to serve a webpack bundle. It also has a little runtime which is connected to the server via socket.io. The server emit information about the compilation state to the client, which reacts on that events.
It serves static assets from the current directory. If the file isn’t found a empty HTML page is generated whichs references the corresponding javascript file.
In a nutshell, the file /webpack/server.js is the http server utilizing the
Webpack Dev Server API:
-
/webpack/webpack.hot.config.jsconfigures the webpack assets. - Has a couple of json responses.
- Configures “hot” to be true to enable hot module replacement.
JavaScripts
Webpack handles the following aspects of the /webpack/assets/javascripts
directory:
- Preparing a “bundle” of the JavaScript files needed by either Rails or the
Webpack Dev Server. This includes running the files through the jsx and es6
loaders which transpile the jsx and es6 syntax into standard javascripts.
Heres’ the configuration that does the loading:
1module.loaders = [{ test: /\.jsx$/, loaders: ["react-hot", "es6", "jsx?harmony"] }] - Webpack also normalizes whichever module loading syntax you choose (RequireJs, CommonJs, or ES6).
Sass and images
For the Webpack Dev Server build (not the Rails build that creates
rails-bundle.js), Sass is loaded via webpack for 2 reasons:
- Webpack takes care of running the sass compiler.
- Any changes made to sass or css files are loaded by the hot module loader into the browser.
The file /webpack/scripts/webpack_only.jsx contains this:
1 2 |
|
This “requires” stylesheet information just like a “require” of JavaScript.
Thus, /webpack/index.html does not reference any output from the Sass
generation. This file, webpack_only.jsx is referenced only in the
webpack.hot.config.js file as an “entry point”, which means that it gets
loaded explicitly in the created bundle file.
Images were a bit tricky, as during deployment, you want your images
fingerprinted for caching purposes. This is nearly invisible to users of newer
versions of the Rails, thanks to the fingerprinting feature of the Rails asset pipeline.
While webpack can also fingerprint images, that’s not needed as we’re not
depending on this feature of webpack for our Rails deployments. So we just need
the Webpack Dev Server to access the same image files. I.e., we need to be able
to use a syntax in the scss files to reference images that works for both the
Webpack Dev Server as well as the Rails asset pipeline.
For example, here’s a snippet of sass code to load the twitter_64.png image
from the top level of the /app/assets/images directory. This needs to work for
both the Asset Pipeline as well as the Webpack Dev Server.
1 2 3 |
|
The problem of how to get the same images into the stylesheets of both Rails and Express server versions was solved by using a symlink, which git will conveniently store.
-
/webpack/assets/imagesis a symlink for the/app/assets/imagesdirectory. - The
image-urlsass helper takes care of mapping the correct directories for images. The image directory for the webpack server is configured by this line:1module.loaders = [{ test: /.scss$/, loader: “style!css!sass?outputStyle=expanded&imagePath=/assets/images”}]The sass gem for rails handles the mapping for the Asset Pipeline.
- The symlink was necessary, as the Webpack Dev Server could not reference files above the root directory.
This way the images are signed correctly for production builds via the Rails asset pipeline, and the images work fine for the Webpack Dev Server.
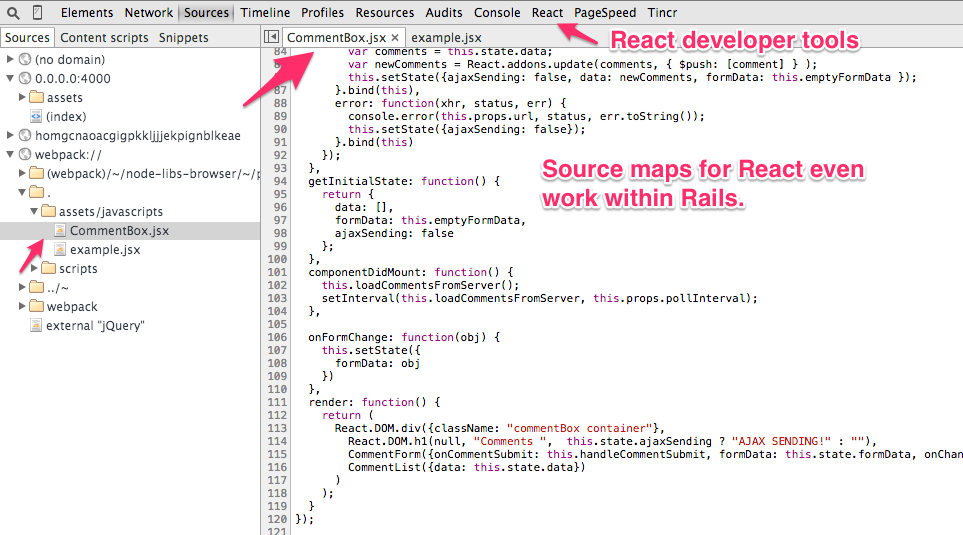
Sourcemaps
When debugging JavaScript using the Rails app, I did not want to have to scroll
through a giant rails-bundle.js of all js assets. Sourcemap support in Webpack
addressed that issue. At first I tried to use plain sourcemaps (separate file
rather than integrated), but that resulted in an off by one error. Furthermore,
I had to do some fancy work to move the created file to the correct spot of
/public/assets. Also note that building the sourcemap file when deploying to
Heroku breaks the Heroku build. Both of these cases are handled at the bottom of
the file webpack.rails.config.js.
This is what sourcemaps looks like in Chrome
Heroku Deployment
There are several things needed to get builds working on Heroku.
- It’s critical that
package.jsonhas all tools required by the Heroku build independenciesand notdevDependenciesas Heroku only installs those modules independencies. You should usedevDependenciesfor tools that only your local Webpack Dev Server uses. - Clean up your build cache:
1
2
heroku plugins:install https://github.com/heroku/heroku-repo.git heroku repo:purge_cache -a - Be sure to run npm-shrinkwrap after ANY changes to
dependenciesinside ofpackage.json. - I needed to configure the
compile_environmenttask to create therails-bundle.jsvia Webpack using the file/lib/tasks/assets.rake. - Heroku needs both the node and ruby environments. In order to deploy to heroku, you’ll need run this command once to set a custom buildpack:
1
|
|
This runs the two buildpacks in the /.buildpacks file courtesy of the
ddollar/heroku-buildpack-multi buildpack.
Why node_modules and package.json are not in the webpack directory?
While it would be tidier to put node_modules and package.json into the
/webpack directory, the problem is that this would require a custom buildpack
for installing the node_modules on Heroku.
Why Have a Second Assets Directory Under Webpack?
At first, I had Webpack reference the JSX files from the
/app/assets/javascripts directory. However, I wanted to be able to use a
WebStorm project just based on the JavaScript code. I’d either have to put the
WebStorm project at the root level, thus including all the Ruby directories, or
I could use a sym link to the javascripts directory. You NEVER want run two
different JetBrains products simultaneously on the same directory, so that ruled
out using WebStorm at the top of my Rails app. The symlink approach seemed to
work, but that got confusing especially given I’d sometimes open the JSX files
in Emacs.
The approach of putting the webpack bundled assets under the /webpack/assets
directory worked out well for me. It seems natural that Webpack bundles those
assets and puts them into the rails-bundle.js file in the
/app/assets/javascripts directory.
For the same reasons, I’m keeping style sheets referenced by Webpack under the
/webpack directory. Note, I’m using Webpack to load stylesheets, as that
allows the style sheet changes to be hot loaded into the browser! If you edit any
of the files in the /webpack/assets/stylesheets directory, you’ll see the
browser update with the style changes almost immediately after you hit save. The
standard Rails file /app/assets/stylesheets/application.css.scss references
the file style sheets in /webpack/assets/stylesheets.
How to Add a NPM (JavaScript) module dependency?
This is a bit like modifying your Gemfile with a new gem dependency.
- Modify your
/package.jsonfile with the appropriate line for the desired package inside the “dependencies” section. You’ll want to specify an exact version, as that’s the recommendation in the Node community. Just google “npm” and you’ll get a link to the npm page for that module where you can see the version. For example, to add markedas a dependency, I added this line topackage.json.1"marked": "^0.3.2", - Include the appropriate line to require the module. For example, to include
the
markedlibrary:1var marked = require("marked");
How to update Node Dependencies
When you’re ready to take the time to ensure that upgrading your packages will not break your code, you’ll want to take the following steps. Refer to npm-check-updates and npm-shrinkwrap.
1 2 3 4 5 6 |
|
Rapid Client Development
Congratulations! You’ve gotten through what I believe is the secret sauce for rapid client side JavaScript development. Once you get the setup, per the above steps, the flow goes like this:
- Run the Webpack Dev Server on port 3000
1cd webpack && node server.js - Point your browser at http://0.0.0.0:3000.
- Start another shell and run
1foreman start -f Procfile.dev - Point your browser at http://0.0.0.0:4000 and verify you can see the usage of the rails-bundle.js file.
- Update the
jsxandscssfiles under/webpack/assetsand see the browser at port 3000 update when files are saved. - Start with static data in the JSX creation, and then move to having the
server.jsfile vend JSON to the client. - Once that works, have the rails server create the JSON.
- Deploy to Heroku!
- Prosper!
Links
- Github repo for this code: justin808/react-webpack-rails-tutorial
- Live version of this code on Heroku: http://react-webpack-rails-tutorial.herokuapp.com/
- Storing or Excluding Node Modules in Rails Git Repositories?
- Pete Hunt’s introductory guide to getting started with Webpack.
Acknowledgments
This work was inspired by a project for my client, Madrone Inc.. The founder clearly desired a UI that did not fit into the standard request/response HTML of Rails. If you want to work with me on this project, or other related projects, please email me.
I’d like to thank the following reviewers: Ed Roman, @ed_roman, Greg Lazarev, @gylaz, Geoff Evason, @gevason, Jose Luis Torres, @joseluis_torres, Mike Kazmier, @Kaztopia, John Lynch, @johnrlynch, Jonathan Soeder, @soederpop, and Ben Ward, @mauilabs.
Comments, suggestions, and corrections are appreciated! I hope to get a lively discussion the use of WebPack and Rails in my new discussion forum at http://forum.railsonmaui.com.
Thanks to Hack Hands for supporting the development of this content. You can find a copy of this article in their blog.
Updates
- 2014-09-22: Updated the Heroku Deployment section, including how
dependenciesvs.devDependenciesinpackage.json.
This is a companion discussion topic for the original entry at http://www.railsonmaui.com//blog/2014/10/02/integrating-webpack-and-the-es6-transpiler-into-an-existing-rails-project/